Wednesday, March 9, 2016

Replacing Failed or Damaged Main Circuit Breaker (MCB)


All the houses with electricity supply have a small rectangular box near the main door. This box may be made of Plastic with a transparent cover (new MCB box) or a Metal box/Wooden box (old MCB box)
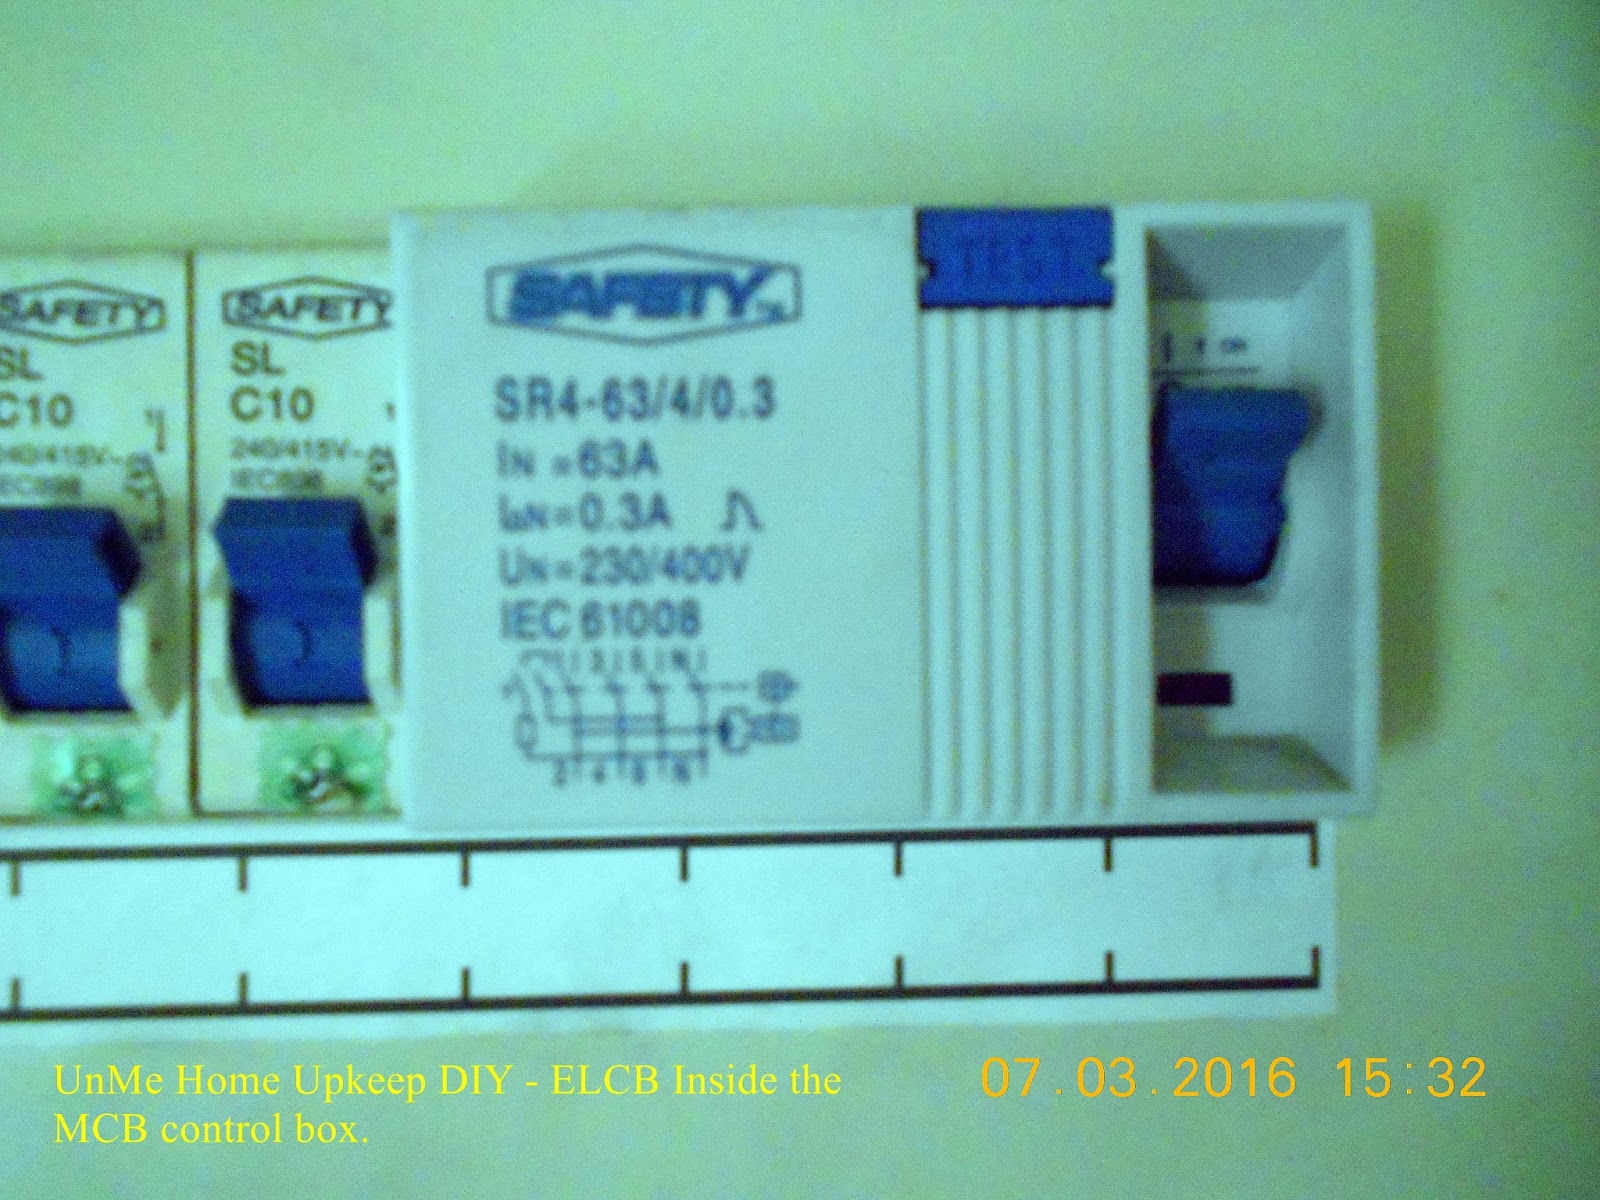
ELCB


Inside the box is a row of Main Circuit Breaker (MCB) plus an Earth-Leakage Circuit Breaker(ELCB) and a Main incoming power switch  that looks like this .(picture on the right)


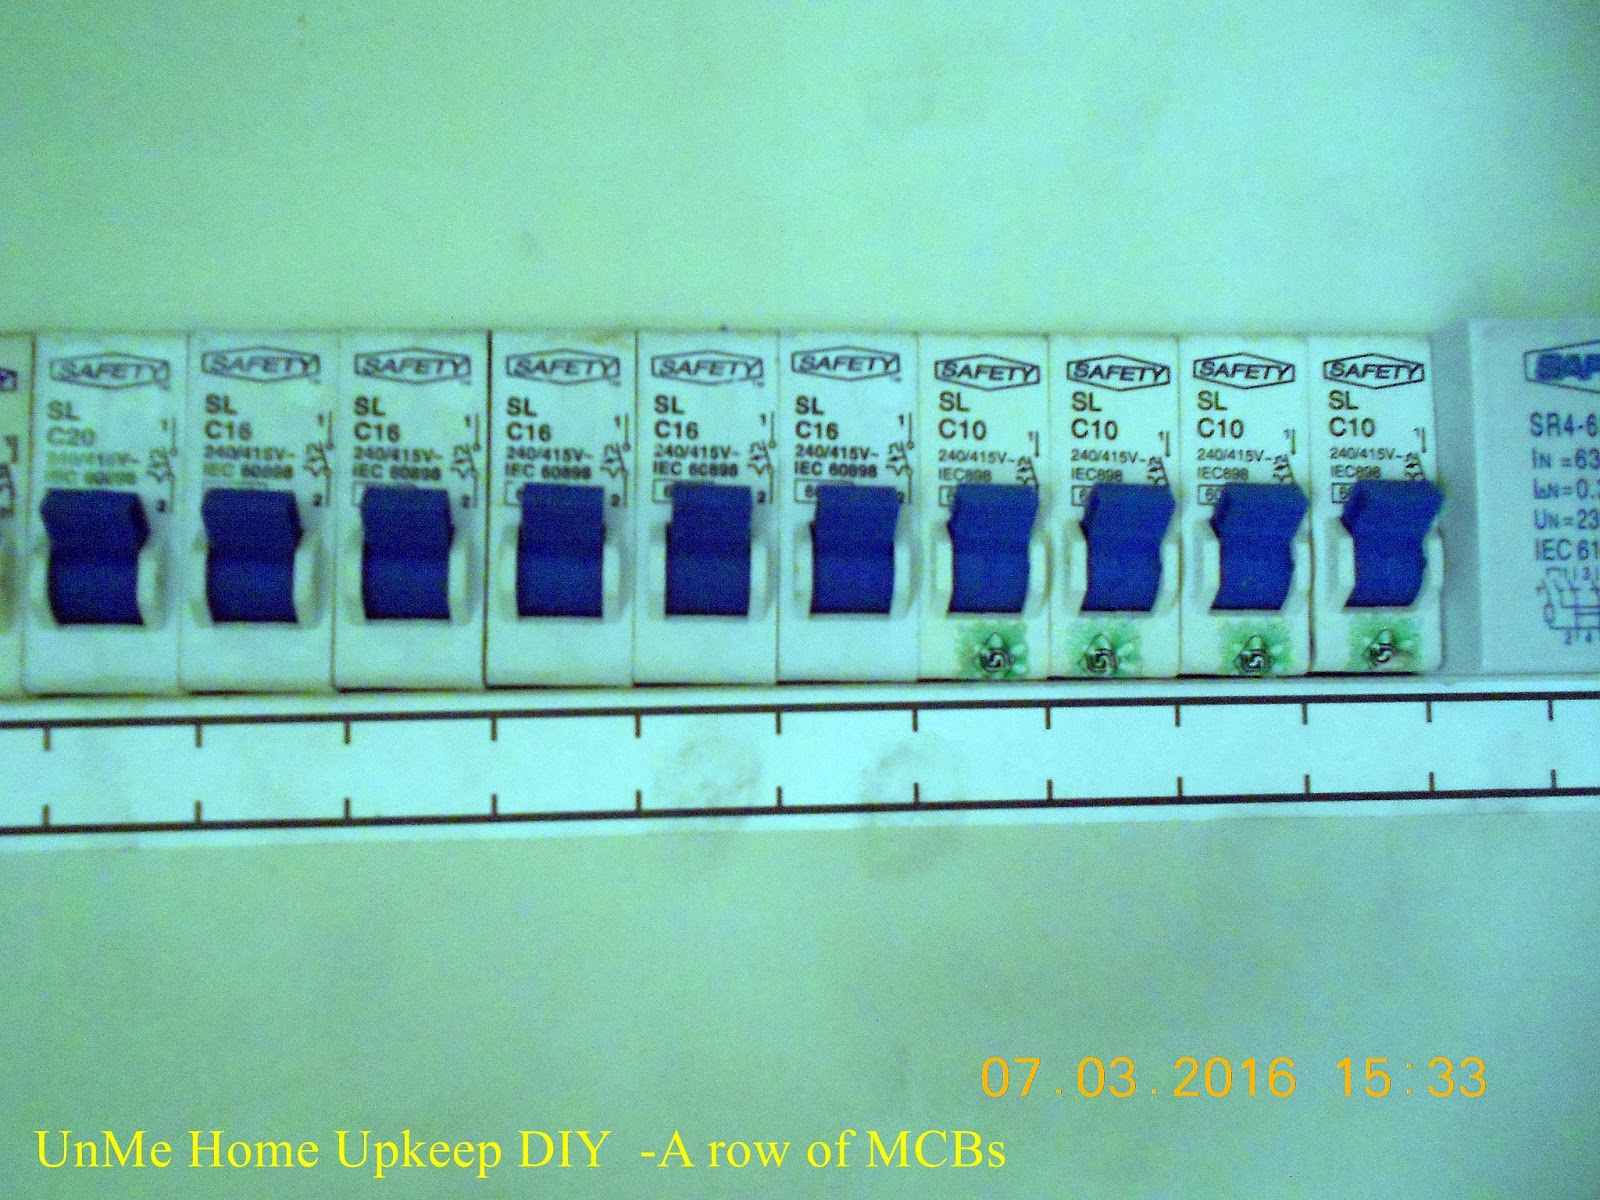
A row of MCB in the box


On the left is a row of MCB

ELCB is the first level of circuit breaking in the event of power leakage or overloading.

MCB is the second level circuit breaker.


These MCBs do not last a lifetime. After about 10 to 12 years, they will fail and needed replacement.


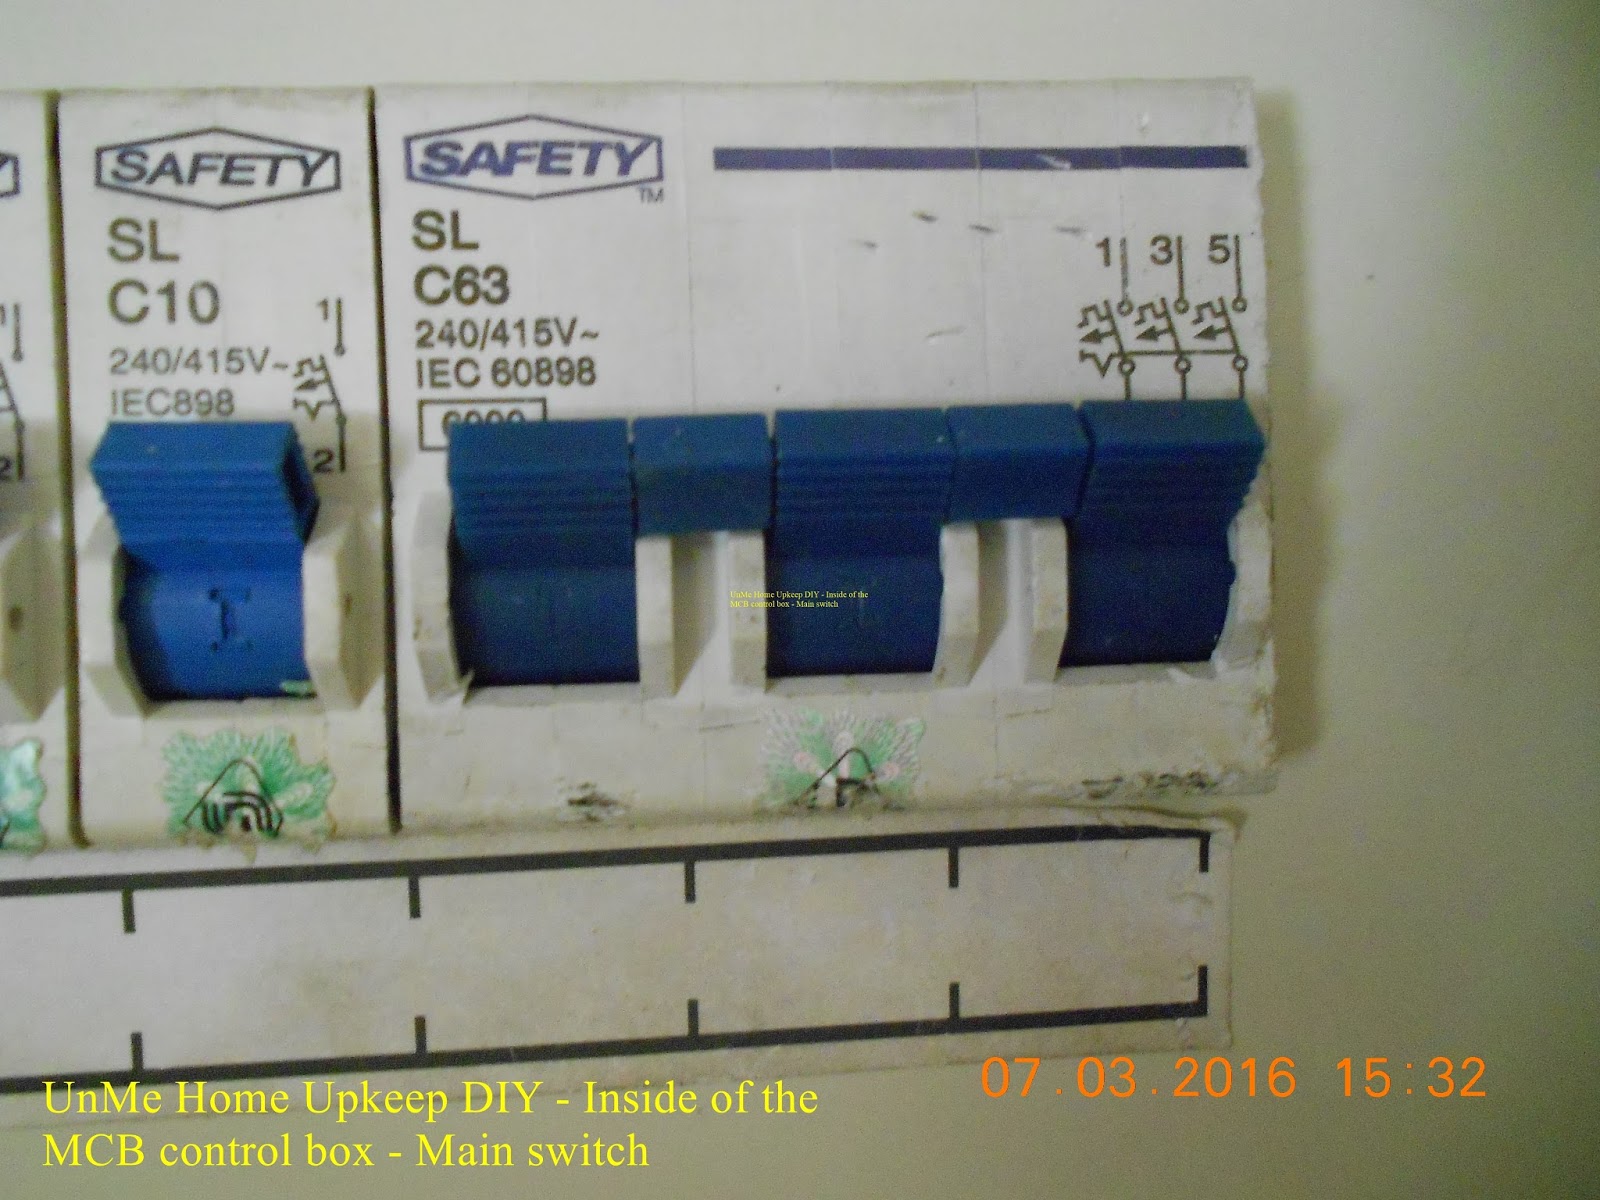
Main Switch in the MCB box.


The ELCB must be tested regularly to ensure proper functioning. The main switch must be turned off before changing or replacing any MCB.

Warning: IF you are not trained, DO NOT meddle with MCB box.  This is highly DANGEROUS.

LEAVE THIS JOB TO A QUALIFIED ELECTRICIAN.

I have a friendly electrician who would  take care of all the wiring and electrical problems in my house. He has served me well for many years. He would not fail to answer to my electrical problems. Sometimes, the 3-Pin power socket simply has no power supply. The light refused to lighten up with the switch turned on. A certain section of the house has no power supply completely i,e, the Fridge, the light and the fan all not working. And this is usually caused by a tripped or failed MCB. He would obligingly come and changed the failed MCB or simply re-set the tripped MCB. Most of my calls for his services are related to MCB. His charges for materials and labour are reasonable.

To replace a MCB is only a half an hour job, but lately, he spent 1 to 2 hours in the traffic to come and another 1 to 2 hours to go back to his shop. He always come with an assistant electrician. That is about four and a half man-hours per person multiply by two persons is equivalent to nine (9) man-hours for the simple job. That is probably not very profitable to him to charge me RM180 (USD45.00) for replacing one MCB.

He decided to terminate his services and taught me some basic electrician skills and how to replace a MCB.

Henceforth, I have been replacing the MCBs DIY in my home.

Important: MCB, ELCB and Main Switch position are different from normal switch. UP position is power on, DOWN position is power off. (The old level switch in Malaysian home is the opposite. UP position is power OFF and DOWN position is power ON.)

DO NOt touch the LIVE wire to the Main switch, even on OFF position. It still has electricity current.

If the MCB is on down position, the power supply has tripped. This could be due to overloading or power leakage at the device or appliance's point. To test the MCB, switch off all the power points connected to this MCB. Then re-set the MCB by pushing the MCB switch lever upwards.  If the switch cannot be pushed to re-set or  the lever refused to stay up, this means the MCB has failed,

Once the MCB is successfully re-set or replaced, turn on the power points connected to this MCB one by one.

The power point/appliance/device that caused this MCB to trip is the one with power leakage or overloading. This is not a MCB issue and needs a different solution.


Highly recommended to wear a pair of cotton gloves and rubber shoes as a safety precaution while working on MCB box. 

Replace the MCB with the same power rating only. MCBs for
home use come in C10, C16, C20 and C32. The number denotes the amperes of electricity. That is 10 amps to 32 amps range only.


There are various brands of MCB in the market. The more reliable and reputable brand are HAGER. GE and ABB.  The common  local Malaysian brand are MAXGUARD and  SAFETY. The price difference between European brand and Malaysian brand MCB is great. HAGER cost about RM8.50(USD2.15) a piece. The Malaysian brand MAXGUARD is only RM4.50 (USD1.15) per piece.

To replace a MCB,  the following procedures must be strictly observed:-

1. Push the test button of the ELCB, The ELCB switch lever will drop down.
2. Push to the Main switch lever in the MCB box downwards to disconnect power supply to all      the MCBs.
3. Use a test pen to test all the MCB wire connections to ensure that there is no electric current flowing. Only after all the tests have passed, then only start to dislodge the damaged/failed  MCB.
4. Push the plastic clip at the bottom of the failed MCB downwards to unlock from the bar.
5. Push the MCB upwards to dislodge completely from the bar.
6. Unscrew and remove the wire at top of the MCB.
7. Re-connect the same wire to a new MCB of the same rating..
8. Insert the new MCB from the top of the bar. Ensure the hook of the MCB is hanging on the bar.
9. Push the MCB inwards toward the bar and lock securely by pushing the plastic clip upwards.
10 Ensure the MCB is properly secured to the bar by pulling outwards to test it.


To restore power to the MCB, turn on the ELCB first, follow with the Main switch.

It is advisable to turn off all the MCB before restoring power. After the main switch lever is put to ON position, switch ON the MCB one by one.


                I dismantled this failed MCB to find out the cause of the failure.
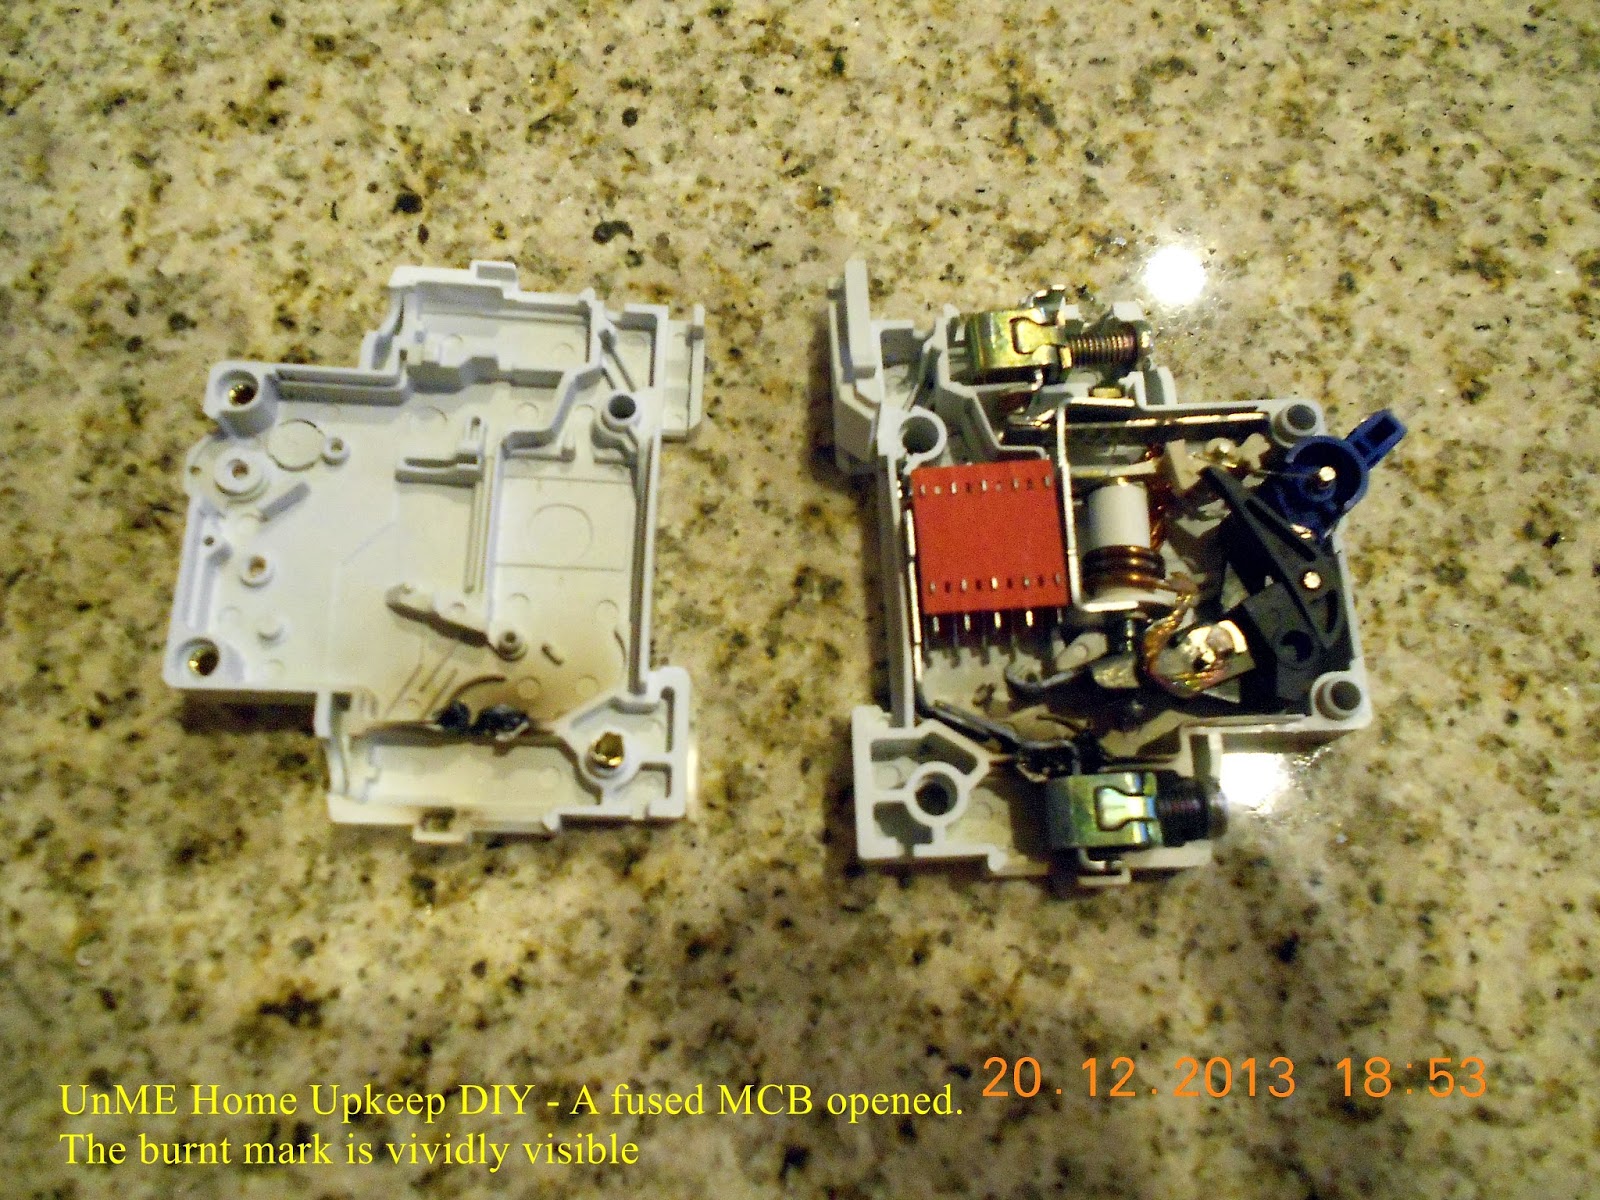
This is a badly burnt MCB 

I always keep a few MCB of C10. C16 and C20 as spares for replacement whenever required, so that I need not run to the electrical supply shop frequently. My MCB box is 13 years old now and prone to MCB failure.
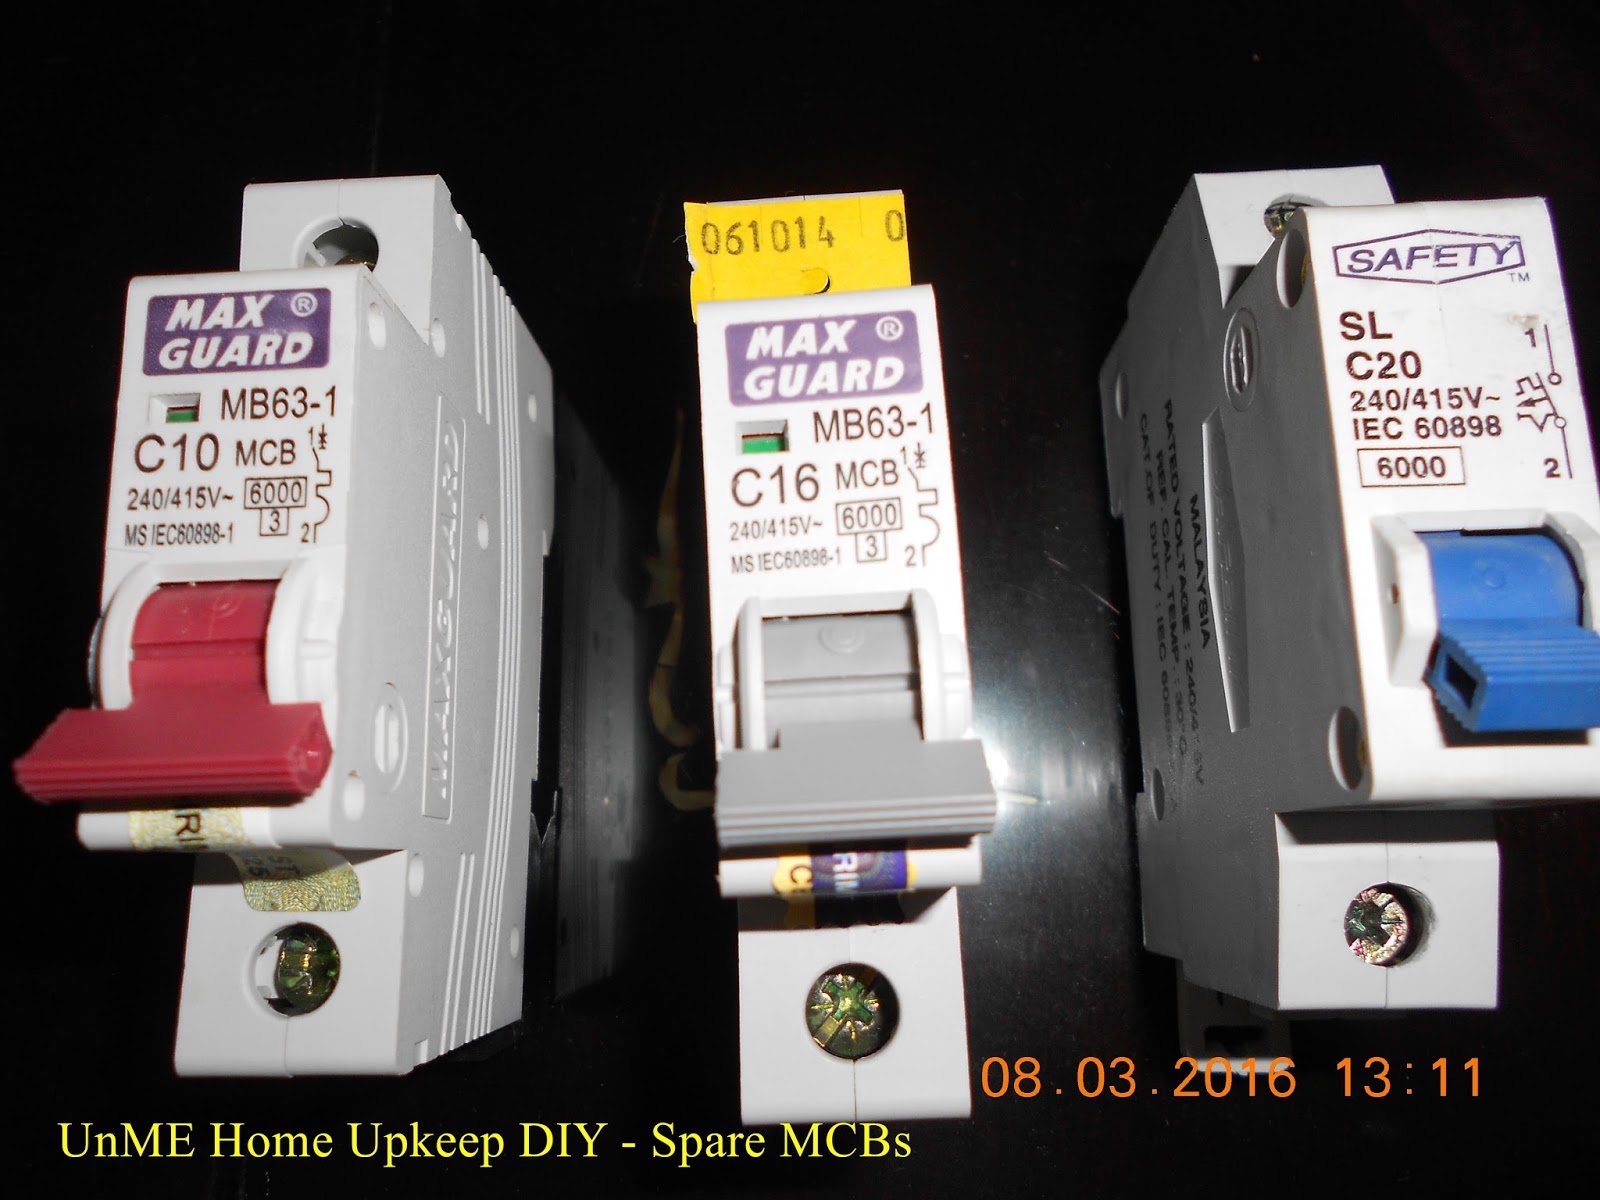
The Most Commonly Used MCB in home are C10, C16 and C20


DO NOT attempt to change the MCB DIY, without proper training from a qualified Electrician


Thursday, February 25, 2016

Installing Ceiling Mounted Infrared Motion Sensor Light Switch

The current hype of "Intelligent Home" is a myth or a reality? My idea of an "Intelligent Home" is one where all the appliances and facilities at home can be controlled or operated remotely via mobile devices or automatically with a user-defined program and with failure-proof warranty.

The software and remote devices are already available in the market. The question is how many Malaysian can manage this "Intelligent Home" system efficiently and effectively. How reliable is the system? How good is the support and maintenance services. Electronic devices can failed without any warning sign.  What is the back-up system in the event of circuit board or electronic chip failure?

Pending the arrival of a "full proof" system, I opted for the  simpler devices such a Photo sensor, Infrared Motion Sensor, Relay switch and timer switch.


The timer switch was first used in Canada in 1908. Today, this device is widely use for Advertising hoarding board lighting , business signboard lighting  and street light. User can set the time for the appliance or equipment to be switched on and off.


Photo sensor detects the surround brightness and will automatically switch the equipment on when the surrounding environment is dark and turn off the light when the environment  is bright. I used this sensor for my garden light.


Infrared Motion Sensor detects the heat of occupancy and motion in the environment. This device will turn on the equipment when heat and motion is detected in the environment and switch off when the heat and motion is not detected after a certain pre-set duration.


Timer Switch and Photosensor switch are ready available from local electrical supplier, hardware or DIY shop. But Infrared Motion Sensor is rare in Malaysia. Not many users for this device and therefore, quite difficult to source locally.

Intelligent Passive Infrared Motion Sensor light was invented by two Malaysian brothers from Sitiawan.  They won the Geneva Inventors Award in the early 1980s. The commercialisation of the invention did not take off very well due to lack of awareness and users. Thirty years later, this device is widely used in office premises in the Western countries. There is still a limited number of home users.

I am an avid user of Infrared motion sensor since 1990 with a table lamp. Now, my house is cluttered with Infrared Motion sensor from table lamp to wall light and ceiling light. The earlier sensors are either wall mounted or ceiling surface mounted and they can sense only 180 degrees wide
 This is my first ceiling flush mounted and 360 degrees sensor . It is more aesthetic and not easily visible or known to intruder or visitor. This is available from online shopping site costing about RM32.00 (USD8.00), inclusive of courier/shipping charges.


The most difficult task of installing a ceiling flush mounted sensor is finding the right position, retrieving the power supply wires inside the ceiling and cutting the hole on ceiling board. The plaster ceiling board is fragile and can be damaged easily. Do plan properly before cutting a hole in the ceiling.

Use an electric drill and a small saw blade to cut the round hole


Three pieces of one-foot long(2mm)wires are required to connect the sensor to the power supply and the light fitting.


Set the duration for the light to last upon detection of motion (2 to 5 minutes) and the lumen of the surrounding environment to activate the sensor switch.

Once the wires are properly connected and the desired setting done, pushed the two anchoring spring clips upward and insert the sensor into the hole in the ceiling board. The sensor sits nicely in the ceiling, with only the eyes of the sensor exposed.


The device is successfully test when the surrounding environment reached the set lumen.


Tools required for this installation are;-

1.An electric  Drill
2. A six-foot ladder
3. A thin saw blade
4. A test pen
5. A small precision screw driver
6 A Philip screw driver.
7. A wire stripper


Thursday, February 18, 2016

Converting Energy Saver Florescent Down-light to LED Down-light

Conserving energy and lowering electricity consumption is every consumers' responsibility to reduce global warming and preserve the mother earth. This also helps to keep the earth green.

I can choose to replace the Energy Saver down-light with a new LED down-light. But this is a costly option. A complete set of new LED down-light cost about RM48.00 (USD 12.00) each. To convert it DIY only cost RM10.50 (USD2.63). That is RM8.50 for the new LED bulb and RM2.00 for the E27 bulb holder.

Electricity consumption is  burning a big hole in my pocket with the last tariff increase by Tenaga Nasional last year. Even with the current low crude oil price, the electricity tariff is unlikely to be revised downward in the future. In Malaysia, what goes up never comes down. This is very true with utilities and foods prices. When Crude oil price goes up, every thing increase in price. When Crude oil goes down, petrol and other fuel prices remain high. Food prices continue to increase. Why?  I Simply cannot understand the economic of prices in Malaysia.


Converting the Energy Saver florescent down-light to LED down-light is a simply process of dismantling the down-light from the ceiling board, remove the choke  and bulb holder from the frame and replace it  with a standard 27 bulb holder.


The LED 10W on the left (above)cost only RM8.50 per piece versus the Energy Saver costing RM12.00 each.
The 10W LED bulb provides 900 lumen brightness. Whereas the 18W Energy Saver generates 800 lumen. On top of this the LED generates less heat than Energy Saver. I can touch the LED bulb even after being switched on for three hours. But not for  the Energy Saver florescent bulb.
.
Dismantling and re-installing the down-light frame involves only three (3) spring clips shown above.


First, Remove the bulb from the holder, follow with the reflector by just pulling down lightly from the frame.  The three spring clips is now exposed for dismantling. Removing the three spring will dislodge the frame from the ceiling board. The frame is still suspended on the live and neutral wire. Please ensure the switch if off and the neutral wire has no current flow from other sources, using a test pen. (Very important warning- many electricians were electrocuted in Malaysia by neutral wire.) Disconnect the two wires to remove the frame for conversion.


The only tools for this job is a Philip screw driver and a test pen.
A re-installed LED down-light (below)
A converted LED down-light is re-installed securely on the ceiling board.


Friday, December 19, 2014

Chinese New Year Gang Lantern Lighting.

The festive season is approaching. Chinese New Year 2015 will be in mid February.

It is not too early to plan and shop for lighting decoration, if you 
wanted something different and unique. Shopping for the lighting
equipment is no easy task. You may not even find one after 
numerous trips to various lighting shops.
These are the tools required for the job
I wanted a gang light of six lanterns for my car porch, during the 
last Chinese New Year. Lighting contractor and electrician 
recommended simple wiring in the ceiling with six bulb holders 
connected to a power source. They will cut open the ceiling board and plaster back after the job is completed.  The second Option  is to run surface wiring on the ceiling with PVC casing and 
conventional bulb holders fastened to the ceiling board.
A drill with a 1-inch hole saw to cut
holes for fixing bulb holders


Cutting the Aluminium
U Channel to the required length
The issue is the cost and aesthetic.. It cost RM1,500 to fix up six 
lanterns inclusive of wiring plus the bulb holders hanging 
permanently on the ceiling board. 
Self Fabricated fastening
 brackets
The wire and clip-on bulb holder is hidden
 inside the U channel
Fixture installed using 4 pieces
of brackets
Testing before installing onto the ceiling

My preference is some kind of fixture that I can fix and remove 
easily, when not required. 
The solution is to fabricate my own gang lighting with a single 3-pin plug for power supply connection.. 
Completed Installation of 6-gang lanterns

This gang lighting is secured on to the ceiling with 4 pieces of self-fabricated aluminium brackets. Installation and dismantling of the entire set of fixture only requires a screwdriver. 

The clip-on wire, clip-on bulb holder and a 1 X 2 inches aluminium U-channel is used to fabricate the set of gang lighting fixture.

Tools required to fabricate the gang lighting are:-
1. Electric drill with a1-inch diameter hole saw.
2. Measuring tape 
3. Angular ruler.
4. Hack saw
5. Wire cutter
6. A pair of cotton gloves.
7. Lockable extention pole for support,
8. A 6-foot ladder.
The Final Product

The total cost materials required are:-
1. 8 meters of Clip-on wire (RM12.00)
2. 6 pieces of Clip-on bulb holder (E27 screw type) RM12.00
3. 1 bar of 20 feet Aluminium U-channel. (RM51.50)
4. 4 Aluminium bracket fastener. (RM2.00)

Total Cost RM77.50 (Materials only)

The entire set of lanterns can be unplugged from the power socket
 and remove from the ceiling, when not required.


Tuesday, October 2, 2012

Multiple Water Filter.

The secondary filter is not
connected yet


Why do I require multiple water filters?


This is due to the very poor quality water being supplied to our home by the water Authority.  Until a filter is installed, the contaminated  water is normally not visible to our naked eyes.  I always use two filters. One sediment filter is installed at the main inlet pipe from the water Authority and a secondary ceramic filter at the kitchen tap. This works very well for many years. But recently, the quality of the  water  has deteriorated. The main sediment filter is unable to clean the water efficiently. This resulted in the secondary ceramic filter in the kitchen being clogged quickly with low pressure and lightly stained water.
This is only two-week usage.
See the amount of contaminants.


In spite of the regular back flush washing of the primary sediment filter,  stained water still flows into the kitchen tap and water tank.


To overcome this problem, a second sediment filter was installed to re-filter the water.
See how dirty is the ceramic filter candle.
Compare this with the clean filter candle above.


To fix up  a water filter using UPVC pipe and joints is a fairly easy job, Unfortunately, my primary filter is connected to the water main and kitchen using copper pipe.  Therefore, I have to connect the second sediment water filter with the same type of pipe. Copper pipe and copper fittings,  now cost ten times the price of similar hardware made of UPVC. The advantage is no odor contamination in the water using copper pipe.

15mm and 20mm Copper pipe


If cost is an issue, one can still use a combination of UPVC and copper pipe but this will involve additional couplings and adaptors, due to thread difference.

The couplings, elbows and t-joints required
for the connection.


These are the tools required.


Use copper tube cutter to cut the pipe
to the required lenght

Looks complicated but offer various options.
By just switching the ball valves, the filters
can change from serial to parallel
or stand alone operation.
The piping work looks complicated. This is not a simple two-serial filter connection.  This connection provides many options. These two sediment filters can operate as a stand alone filter, serial filter or parallel filter, by just turning the ball valves. The stand alone filter operation is very useful when one filter is undergoing back flush washing. During  back flush washing of the filter, the water supply is temporary halted.  But the other filter operates normally and hence. there is no disruption of water supply to the kitchen or the water tank.

This whole job cost RM320.00 (USD100.00) and took nine man-hours to complete. The 20mm copper pipe is selling at RM8.00(USD2.50) per foot run. Each copper coupling/elbow cost RM7.50(USD2.35).


Wednesday, August 8, 2012

Sail Shade for your Garden

The steel cable is not clearly visible, if not for the
 chunky turnbuckle.
You want to put a nice little coffee table in your garden to enjoy your morning coffee and newspaper but don’t want the hot sunlight? OR need to protect the car from the tropical heat of the sun?  Or to protect the lovely KOI fishes in the fishpond from direct sunlight?  If you only wanted the shade but not a permanent structure in your garden or courtyard, then  Sail shade provides the solution.

Shade Sail  is commonly used in USA. UK  and Australia during summer time. Malaysians are following this trend now.

Off the shelf shade sail from Houz Depot
Why  is this shade called SAIL SHADE?

While there are differences of opinion and names do vary from place to place it is increasingly common to define a shade sail as…. “a fabric membrane tensioned between three or more anchor points”.  This is about the simplest description possible for something that can get quite complicated. (*Courtesy of Shade Group)

A shade structure is now regarded as something like a shade sail insofar as it has a fabric membrane but it is tensioned over or supported by a frame.
Sometimes a shade sail will be described as a “shade structure”.  There are a number of reasons for this, the main one being that they see a shade sail as a “construction” therefore the reasoning goes ..if it is constructed it must be a “structure”.  However sometimes it is a simple case of mistaken identity or ignorance. 
Looks like a floating shade sail over the fish pond


Sail or Permanent Structure(Canopy)
You need to first determine your priorities – often this is a case of effectiveness versus aesthetics.  Good design can blend both.  You want a permanent fixture or a temporary one. There are certainly technical limitations with materials, site restrictions, regulations and prudent design parameters.  Cost is also a serious consideration. 
The next question might be to determine if shade only or waterproof is needed.  
Generally a PVC shade sail or shade structure will be noticeably more expensive than a similar shade cloth version.  People often think waterproof PVC is better but upon closer examination shade cloth (shade only) is more than sufficient for their needs. 

SHADE SAIL MUST be installed FIRM AND TIGHT so as to reduce windflap in the shade fabric. SHADE SAILS that are loose and sloppy will cause premature failure due to stress.

The shade sail comes in three different shapes, namely triangle, square or rectangle.  The sizes varies.

Installing shade sail DIY is easy if there are available anchor points in your garden. The pillar, column and railing of your house can provide ready anchor points. Anchor plate with U hook may be required on certain column and pillar, to fasten the steel cable.
Anchoring plate fixed on the fencing pillar

Fixing poles for anchoring the Shade sail can be disastrous unless this is done with proper footing to withstand the tension of stretching the fabric.

Shade sail are readily available in Malaysia from shade specialist, Houz Depot or Ikea. Alternatively, there are many on-line suppliers from USA, UK or Australia.

Material required for fixing my shade sails(triangular shape sail) are:-


1    1)     26 feet of Steel cable                                                                   RM8.40(USD2.55)
       2)     3 units Turnbuckle (or tension buckle)                             RM5.00(USD1.51)
       3)    12 pieces Steel cable clamp                                                    RM3.60(USD1.09)
       4)  2 units Shackle                                                                             RM4.00(USD1.21)
       5)    2 units U hook anchor plate.                                                    RM4.20(USD1.27)
       6) 1 piece Shade Sail 3.5m X3.5M X3.5m (triangular shape). 
                                                                                                                        RM135.00(USD40.90)
The accessories for fixing temporary shade sails.
Steel cable, turnbuckles, Anchoring U-hooks,
cable clamps and rawlplug(for fastening
anchoring plates)

Tools required are:-

    1) an electric drill for fixing the anchor plates
    2)  a Plier & a screwdriver for fixing cable clamps and turnbuckles.


Total cost of fixing the shade sail is RM160.20(USD48.55)

Professional shade suppliers quoted RM1.800 for a similar size shade sail. This sum is inclusive of  3 pieces of mild steel pole of 8 feet high for anchoring. I do not want a permanent structure in my garden. So the anchoring poles are redundant. But the shade specialist refused to do the job  without using poles. This is Malaysian suppliers’ attitude.

This shade sail is anchored on the fencing pillar and house column.
Just twist this turnbuckle to tighten or loosen
the cable tension and unhook the shade sail
from the cable.
DIY shade sail installation,  without the anchor poles cost only a fraction of the price quoted by the professional shade suppliers. There is no difference in term of tension and  aesthetic  value. Yet there is no permanent structure in your garden. See how this shade sail can be fixed  and removed easily. Just tighten or loosen the turnbuckle attached to the end of the steel cable.


One shade sail over the fish pond and the other for car.