Sunday, March 28, 2010

Modifying Light Fixtures.

I like things unique and exotic. “Visibility and standing out amongst the rest” is being practised by many to get a sense of satisfaction and contentment. Houses in the upmarket areas have unique facades. They have lots of rare designs and fixtures in them.

I have the privilege of visiting some of these exclusive houses.  It gives me a sense of euphoria when I am inside the house. 

I cannot afford exotic cars or houses but I have some exotic light fittings in my house.  

The manufacturer of these exotic lightings only produced a batch and there is no re-run. Breaking any of the components is like breaking the whole light fittings. There is no spare part. Cleaning is another problem. The parts, some in fragile glass sticks and moulded glass panes, have to be removed piece by piece to clean. The bulbs and the fluorescent tubes used in these light fittings are also non-standard type.
 
One of the fluorescent tubes in my kitchen blew out recently. I dismantled the tube and took it to numerous lighting and electrical shops in town. Unfortunately, none of the shops that I visited has the fluorescent tube. It was an uncommon and non-standard tube. 

I have two options. One is to discard the whole light fitting and buy a new one. That would be costly. The light fitting comes in a pair. So that means discarding two units.
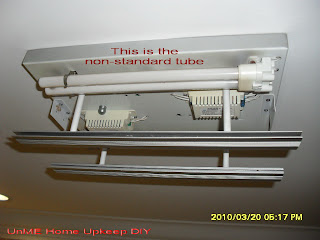
 Being a DIY buff, I chose the second option to modify the light fitting.

I changed the fluorescent tube holder from the 4-pin to a standard 2-pin type and replaced the choke (ballast) as well. 

The 2-pin fluorescent tube holder cost RM4.50 (USD1.35) each while the standard fluorescent cost RM9.90 (USD3.00) each.  With this modification, I need not worry about replacing any blown-out fluorescent tubes again. 


The only tools required for the job are test pen, screw driver, wire stripper/cutter and a ladder.

Sunday, March 14, 2010

Replacing Kitchen Counter-top Water Filter

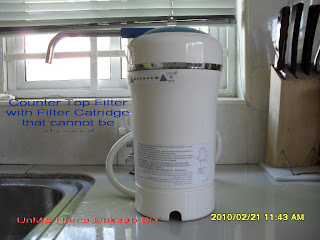
I used a stand-alone counter-top water filter that was easily connected to the water tap (see the picture). This type of water filter is available at any supermarket or hypermarket. Anybody can fix this with a screw driver.

The disadvantage of this type of water filter is the high maintenance cost. The filter cartridge cost RM80.00 (USD24.00) each and last about six months only. Another problem with this type of filter is the adapter for connecting the filter to the tap. Water frequently leaked from the adapter. Once the filter cartridge is clogged,  water will sprout from the adapter. The original adapter from the manufacturer is very expensive. It cost RM60.00 (USD18.88), whereas the common adaptor from the hardware shop cost RM15.00. (USD4.50) but this will not indicate if the cartridge is clogged. Moreover, the filter cartridge is not serviceable. Once clogged, it must be replaced. The filter housing is also bulky and occupied the limited space at the sink counter.

In order to overcome the high maintenance cost and the leakage problem, I have decided to replace it with a stainless steel ceramic cartridge filter. This type of water filter is slim and aesthetic for the kitchen. It cost RM128.00, (USD18.00) for the standard wall mounted type. Because I wanted a counter-top mounting(sitting on top of the kitchen counter), I have to add in a brass counter-top tap and an adapter to change the mounting.  Accessories are available at the bathroom & kitchen fitting shop for you to modify whatever fittings you so choose.

Unless you are a handyman, you may required a plumber to fix this.  You can DIY with just two pieces of wrench and a roll of sealing tape. I have added a stop valve under the counter-top.
 This is to enable any repair work to the counter-top filter without shutting down the water supply to the entire kitchen. Just disconnect the flexi-hose and fix the stop valve with a wrench. 
Then, re-connect the flexi-hose to the filter housing unit. Ensure that the filter housing unit is properly anchored on the counter-top before connecting the flexi-hose.  Connect the ceramic filter cartridge to the housing cap, insert the filter cartridge into the housing and close it securely.

This is a fairly simple job but can turn complicated if the joints are not sealed properly. There should not be even a single drop of water dripping from any joints.


See my new filter on the left and compare this with the old filter on the right.