Tuesday, October 2, 2012

Multiple Water Filter.

The secondary filter is not
connected yet


Why do I require multiple water filters?


This is due to the very poor quality water being supplied to our home by the water Authority.  Until a filter is installed, the contaminated  water is normally not visible to our naked eyes.  I always use two filters. One sediment filter is installed at the main inlet pipe from the water Authority and a secondary ceramic filter at the kitchen tap. This works very well for many years. But recently, the quality of the  water  has deteriorated. The main sediment filter is unable to clean the water efficiently. This resulted in the secondary ceramic filter in the kitchen being clogged quickly with low pressure and lightly stained water.
This is only two-week usage.
See the amount of contaminants.


In spite of the regular back flush washing of the primary sediment filter,  stained water still flows into the kitchen tap and water tank.


To overcome this problem, a second sediment filter was installed to re-filter the water.
See how dirty is the ceramic filter candle.
Compare this with the clean filter candle above.


To fix up  a water filter using UPVC pipe and joints is a fairly easy job, Unfortunately, my primary filter is connected to the water main and kitchen using copper pipe.  Therefore, I have to connect the second sediment water filter with the same type of pipe. Copper pipe and copper fittings,  now cost ten times the price of similar hardware made of UPVC. The advantage is no odor contamination in the water using copper pipe.

15mm and 20mm Copper pipe


If cost is an issue, one can still use a combination of UPVC and copper pipe but this will involve additional couplings and adaptors, due to thread difference.

The couplings, elbows and t-joints required
for the connection.


These are the tools required.


Use copper tube cutter to cut the pipe
to the required lenght

Looks complicated but offer various options.
By just switching the ball valves, the filters
can change from serial to parallel
or stand alone operation.
The piping work looks complicated. This is not a simple two-serial filter connection.  This connection provides many options. These two sediment filters can operate as a stand alone filter, serial filter or parallel filter, by just turning the ball valves. The stand alone filter operation is very useful when one filter is undergoing back flush washing. During  back flush washing of the filter, the water supply is temporary halted.  But the other filter operates normally and hence. there is no disruption of water supply to the kitchen or the water tank.

This whole job cost RM320.00 (USD100.00) and took nine man-hours to complete. The 20mm copper pipe is selling at RM8.00(USD2.50) per foot run. Each copper coupling/elbow cost RM7.50(USD2.35).


Wednesday, August 8, 2012

Sail Shade for your Garden

The steel cable is not clearly visible, if not for the
 chunky turnbuckle.
You want to put a nice little coffee table in your garden to enjoy your morning coffee and newspaper but don’t want the hot sunlight? OR need to protect the car from the tropical heat of the sun?  Or to protect the lovely KOI fishes in the fishpond from direct sunlight?  If you only wanted the shade but not a permanent structure in your garden or courtyard, then  Sail shade provides the solution.

Shade Sail  is commonly used in USA. UK  and Australia during summer time. Malaysians are following this trend now.

Off the shelf shade sail from Houz Depot
Why  is this shade called SAIL SHADE?

While there are differences of opinion and names do vary from place to place it is increasingly common to define a shade sail as…. “a fabric membrane tensioned between three or more anchor points”.  This is about the simplest description possible for something that can get quite complicated. (*Courtesy of Shade Group)

A shade structure is now regarded as something like a shade sail insofar as it has a fabric membrane but it is tensioned over or supported by a frame.
Sometimes a shade sail will be described as a “shade structure”.  There are a number of reasons for this, the main one being that they see a shade sail as a “construction” therefore the reasoning goes ..if it is constructed it must be a “structure”.  However sometimes it is a simple case of mistaken identity or ignorance. 
Looks like a floating shade sail over the fish pond


Sail or Permanent Structure(Canopy)
You need to first determine your priorities – often this is a case of effectiveness versus aesthetics.  Good design can blend both.  You want a permanent fixture or a temporary one. There are certainly technical limitations with materials, site restrictions, regulations and prudent design parameters.  Cost is also a serious consideration. 
The next question might be to determine if shade only or waterproof is needed.  
Generally a PVC shade sail or shade structure will be noticeably more expensive than a similar shade cloth version.  People often think waterproof PVC is better but upon closer examination shade cloth (shade only) is more than sufficient for their needs. 

SHADE SAIL MUST be installed FIRM AND TIGHT so as to reduce windflap in the shade fabric. SHADE SAILS that are loose and sloppy will cause premature failure due to stress.

The shade sail comes in three different shapes, namely triangle, square or rectangle.  The sizes varies.

Installing shade sail DIY is easy if there are available anchor points in your garden. The pillar, column and railing of your house can provide ready anchor points. Anchor plate with U hook may be required on certain column and pillar, to fasten the steel cable.
Anchoring plate fixed on the fencing pillar

Fixing poles for anchoring the Shade sail can be disastrous unless this is done with proper footing to withstand the tension of stretching the fabric.

Shade sail are readily available in Malaysia from shade specialist, Houz Depot or Ikea. Alternatively, there are many on-line suppliers from USA, UK or Australia.

Material required for fixing my shade sails(triangular shape sail) are:-


1    1)     26 feet of Steel cable                                                                   RM8.40(USD2.55)
       2)     3 units Turnbuckle (or tension buckle)                             RM5.00(USD1.51)
       3)    12 pieces Steel cable clamp                                                    RM3.60(USD1.09)
       4)  2 units Shackle                                                                             RM4.00(USD1.21)
       5)    2 units U hook anchor plate.                                                    RM4.20(USD1.27)
       6) 1 piece Shade Sail 3.5m X3.5M X3.5m (triangular shape). 
                                                                                                                        RM135.00(USD40.90)
The accessories for fixing temporary shade sails.
Steel cable, turnbuckles, Anchoring U-hooks,
cable clamps and rawlplug(for fastening
anchoring plates)

Tools required are:-

    1) an electric drill for fixing the anchor plates
    2)  a Plier & a screwdriver for fixing cable clamps and turnbuckles.


Total cost of fixing the shade sail is RM160.20(USD48.55)

Professional shade suppliers quoted RM1.800 for a similar size shade sail. This sum is inclusive of  3 pieces of mild steel pole of 8 feet high for anchoring. I do not want a permanent structure in my garden. So the anchoring poles are redundant. But the shade specialist refused to do the job  without using poles. This is Malaysian suppliers’ attitude.

This shade sail is anchored on the fencing pillar and house column.
Just twist this turnbuckle to tighten or loosen
the cable tension and unhook the shade sail
from the cable.
DIY shade sail installation,  without the anchor poles cost only a fraction of the price quoted by the professional shade suppliers. There is no difference in term of tension and  aesthetic  value. Yet there is no permanent structure in your garden. See how this shade sail can be fixed  and removed easily. Just tighten or loosen the turnbuckle attached to the end of the steel cable.


One shade sail over the fish pond and the other for car.


Sunday, May 20, 2012

Re-Painting Metal Grilles and Ornamental Metal.


Gloss paint is the recommended paint for exterior metal grilles and ornamental metal work. This type of paint is a solvent based material that is difficult to work with. Any paint drip is tedious to remove. The same problem goes with cleaning the painting tools.

No paint manufacturer has invented a  water-based gloss paint for metal and wood.  Nippon Paint has just launched a new Hydro-gloss paint for metal and wood. But this is only for interior use.
The metal ornamental pieces removed
 from the grilles to facilitate re-painting.

Diluting gloss paint is another issue. Certain gloss paint can mix with Turpentine only. Turpentine is recommended for diluting most made of gloss paint. It can also be used for removing drips and stains. Thinner is usable only for gloss paint of some manufacturers.  So, it is wise to check with the manufacturer. Thinner is more corrosive than turpentine. It can cause itchiness and burning sensation, if it comes into contact with the skin.
Metal Ornamental pieces fixed,
after re-painting.

In order to avoid the messy cleaning task after each painting,  use a disposable brush or paint roller. Medium quality painting brush or roller is adequate for the job and discarded after application. This is an economical option.

Gate newly re-painted
Before painting or re-painting metal work, ensure that all rust and dirt are removed from the surface. The conventional way of removing rust is using a scrapper and sandpaper. Now, there is a chemical compound that can remove rust easily. This chemical is called “Compound EDE80”. It can be used in concentrated form or dilute with water. 
Removing the rust with a scrapper.

Compound EDE80 is an industrial chemical compound used widely in the metal processing industries.  DIY buff may encounter difficulty in sourcing this compound. 

Apply the Compound EDE80 on the rusted part of the metal with a brush or  a piece of rag. Let it sets in and react with the rust for a day. Thereafter, clean the surface to be painted with a damped cloth. Apply Oxide Anti-rust primer to the rusted areas.The surface must be dry and clean before re-painting.

The gloss paint should be diluted, to reduce the  gummy feel on the brush or roller.

Tools and materials required:

The roller is detachable. Discard and replace after
each painting job.
    1)A short handle  paint roller (small).
      2) Half a dozen roller refill
      3) A pair of cotton gloves
      4) A scrapper.
      5) A small painting brush(the one use by artist)
      6)Gloss paint (quantity depends on the areas to be painted)
      7) A bottle of turpentine.
      8)   A bottle of thinner.
      9)A large plastic sheet (10 ft X 10 ft) to cover the areas from  paint drips
      10)  A stirrer.
1     11)  One liter of Compound EDE 80.

Oxide primer applied on the rusted spot.
Paint the surface with the roller in a gently forward and backward flow or upward and downward direction to ensure a complete and smooth coating. Corners, coves and grooves can be painted and touch-up using an artist brush.

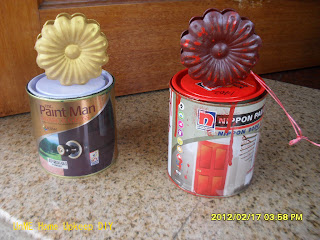
Dipping  the ornamental metal into a can of paint.

The ornamental flower pieces on  my grilles are detachable. For speedier and easier re-painting , these are removed from grilles, cleaned and dipped into the tin of paint.  Let them dry in the sun and fix back a few days later. The paint required about five days  to dry completely, for better adhesion to the metal.


Drying the ornamental metal pieces in the sun.

Wednesday, March 14, 2012

Painting Concrete Fence Wall

Dull and faded wall with dirt stains
The hot and humid weather plus plenty of rain in Malaysia  accelerated the wear and tear to the exterior wall of building, fencing wall and floor. Fine crack lines appear on the plastered concrete column and brick wall. Fungus growth and the accumulated dirt stain turned the walls dull and ugly.

Remove flakes and stains using a pressure jet.
This is the first time I repaint the fencing wall and column, after eight years.  The thought of painting 165 feet by 5 feet of fencing wall scares me and deters me from doing this. I am also reluctant to engage a contractor. It costs too much. But after reading a motivational message from a friend, I was encouraged. Just set aside one to two hours a day for a specific task, many goals can be achieved.  That spurs me to embark on this task. In order to avoid the hot sun, I spend one hour in the morning from seven to eight a.m. and one hour in the evening from five to six p.m. My wife and my son also joined in occasionally to help. The entire  fencing wall was completely re-painted within a time frame of 16 days. 

Stain on the column, below the crown.
The original substrate was treated with ICI Dulux sealer and Anti-fungus Weathershield paint. This fencing wall started to fade after seven years. There wasn’t any fungus growth but some dirt accumulated beneath the shoulder overhung areas of the wall.

It  is difficult to find a good and diligent painter who can produce good and durable paintwork. Most painting contractors engage low skill Indonesian painters and use cheap and low quality paint. Unless one is very specific in the negotiation, most painting contractors deliver a shoddy job.
One side of the wall re-painted with three colours


Another side re-painted
For lasting exterior paintwork, the substrate surface must be clean and dry before re-painting. Clean the surface thoroughly with a high pressure water jet. Allow a few days for the surface to dry. Plaster crack lines with sealant or grouting cement.

I contacted ICI Dulux and Nippon Paint for some technical assistance before commencing on this task.

ICI Dulux Weathershield is a water-based emulsion paint. There are other equivalent paints, but I have not tried them. Re-painting the wall with emulsion paint does not require lots of skills. Some common sense must prevailed to prevent spillage, staining and dripping. There is nothing to worry about paint stain. Simply wash off with water and soap before it dries. Stain can also be easily removed with a piece of damped cloth.

The paint should be diluted to the preferred viscosity that is smooth and not gummy to the roller and does not drip. Add about 20% of water to the can, stir thoroughly and gently with a stirrer to get an even mixture before applying.

Pour a small portion of the paint into the painting tray, Dip the paint roller into the paint and run  over the tray a few times, until the paint is evenly distributed and absorbed by the roller but without any dripping. Then, gently apply the paint on the surface to be painted. A painter’s pole can be attached to the paint roller for areas beyond the reach of arm.

No matter how experienced a painter is, dripping of the paint cannot be avoided. Always place a large piece of plastic sheet or woven fabric of any kind to cover the floor. For any other areas, such as grilles, ornamental pieces,  not to be in contact with the paint roller, insulate them with paper and masking tape.

Tools and material required:-

1.      Emulsion paint for exterior surface.  (Paint for interior surface is different), Weathershield  comes in 5 liter tin only. One liter of paint can cover 110 sq. feet (10 sq. meters) of substrate with two coats.
2.      Paint roller (two sizes: Big and small)
3.      Painting tray
4.      Painter’s pole
5.      Stirrer
6.      A pair of cotton hand gloves
7.      A large plastic sheet or other woven fabric
8.      A scrapper
9.      A ladder or a stool.
10.   A ½ brush
11.   Some old newspapers.
The tools required for painting job.

After each application, wash and dry the roller and tray with water thoroughly. No remnant of the paint should remain in the roller or tray.  Otherwise, the roller and the tray will be rendered unusable once dried.


The ICI Dulux Weathershield of 5 liters cost RM115.00 (USD35.00) per can. A good paint roller cost RM5.00 (USD1.50) from the hardware shop. The painting tray is available at RM2.50 each. The price of painting brushes range between RM2.00 to RM3.50. The total cost of the materials used is less than RM500.00(USD152.00). 


The painting contractor charge RM6,000.00 (USD1,818.00) for this job. Just see what you can save with DIY.

Three 5liter can of paint was used for the job.
The fence wall has three-colour combination

Sunday, February 12, 2012

Replacing the Ball Float Valve of Your Water Tank

Two common causes of  water tank leakage are : 1) faulty ball float valve  and  2) crack.

The water tank is constructed with either Polyethylene, GI mild steel or Stainless steel. Whatever the material used, the condition of the tank will deteriorate and crack will appear due to exposure to sun and rain. Water tank kept in an enclosed area will not be subjected to the hazard of the weather and will last much longer.  But GI mild steel tank will leak  even if it is installed in an enclosed place due to rust. This usually occurs after a life span of about seven years

The most common cause of water tank leakage is due to faulty ball float valve. The valve can malfunction due to various reasons. One common problem is small pebbles trapped at the valve washer. This can be easily resolved by pressing the ball float down to let the water pressure flush out the pebbles. Then push the ball float up to check if it shuts the water inflow.  If not, the valve is faulty and need replacement. The other cause is worn out washer/stopper of the valve. This needs the replacement of the valve.

Another rare problem is the ball float cracked,  resulted in water seeping into the ball and lost the ability to float.

The ball float valve works on the simple physic of water level pushing the ball that is attached to a lever that shuts the valve. When the water level rise, the ball is pushed upwards and shuts the valve. When the water level dropped, the ball is lowered and release the valve, allowing water to flow into the tank (see the diagram).
Diagram downloaded from Google and Valmatic.com,


Replacing the ball float valve can be done DIY, provided the water tank is sited at a place that is within easy to reach and has a place for you to stand and work on. This only involve unlocking and locking three nuts. One needs two pairs of pliers, sealing tape and pair of cotton gloves to do the job. 


My water tank is located on the specially constructed roof top, where I can just walk up from a balcony. Not even a ladder is required.

Remember to turn off the incoming pipe before unlocking the nuts from the faulty valve.
This is a new valve 


The two hexagon nuts at the inlet joint of the valve is to secure the valve to the water tank. One nut inside the tank and the other outside. The end of the inlet joint is fastened to the incoming water pipe with a locking nut at it’s end. Before locking the nuts, ensure the sealing tape is wrap round the thread of the joint to prevent leakage.

The ball float valve in the water tank
The ball float valve is readily available at all hardware shops and DIY stores. Depending on your incoming pipe size, the size must be the same. They come in ½ inch, ¾ inch, 1inch and 1 ¼ inch diameter. These are the common sizes used by Malaysian home.


Old valve was dismantled from the water tank.
The float ball is re-used.


The cost of the 1 inch ball valve(minus the ball float) is RM38.00 (USD11.50).
The ball float can be purchased separately at RM2.00 (USD0.60) each.
A roll of sealing tape is only RM0.60 USD0.18)

Total cost to replace the ball float  valve (excluding tool cost) is RM38.60 (USD11.68). If one were to engage a plumber, the charges for materials and workmanship will be at least RM160.00 (USD48.50).  If one is unfortunate to enlist an unscrupulous plumber, one may get cheated to replace the valve unnecessarily.
Old valve for post mortem 
This whole valve replacement job took only two hours to complete.
This  little washer/stopper is the usual problem creator.


It pays to DIY your home maintenance.


These are the only tools and material required to replace the ball float valve. You can try DIY.


Monday, January 9, 2012

Cleaning Domestic Water Storage Tank.

Most houses will have a water storage tank installed either on the roof top or hiding inside the ceiling. The size of the water tank varies from house to house. The standard tank sizes in Malaysia are in the range of 900 litres to 3,000 litres.
The materials used in the construction of the tank also varies from stainless steel to galvanized iron (GI) and polytank.
This is a stainless steel water tank with fastened
secured lid.

How many house owners will inspect the water storage tank? Some owners never look at their water tank until there is a leakage or visibly contaminated water ran out from their tap.  Some owners will inspect the water tank when the water from the tap smells strange or taste abnormal. A few exceptional owners will inspect the water regularly.

The water storage tank should be inspected regularly for dislodged tank cover. This may sound strange but it happens. Any opening invites creepy crawly creatures from insects to lizards and snails into the tank. Rats can occasionally drown in the water tank. For those water tanks with secured and fastened lid or closure, the tank should also be inspected. You will be surprised to find the kind of dirt accumulated in the water tank. This dirt could be from the main incoming source(mud) or pollutant(dust and other solid particles) entering through the overflow pipe or the ventilation vent(breathing vent).
The two ventilation vents on top of the tank

My water tank is a secured and fastened stainless steel tank. Yet, see the amount of dirt accumulated at the bottom of the tank. This is a combination of mud and dirt. 
See the amount of dirt accumulated at the bottom of the tank, before the cleaning.


The tank should be emptied and washed regularly, preferably every six (6) months.
Using a broom with long pole to reach
the bottom of the tank. Leave some water inside
the tank and sweep gently.
The water will turn coffee brown colour after 

stirring with broom.


For GI tank, there is another problem. The tank may looks perfect from the outside, but the rust can be up to half an inch thick inside the tank. The minute the tank is vibrated, the whole tank breaks up.

The water tank can be cleaned easily by using a soft brush or broom(use a new broom please) with long pole. The dirty water is drained via the outlet valve located at the bottom or near the base of the tank. 
Drain the dirty water via the bottom outlet valve.
See the coffee brown colour water being discharged.


Rinse the tank thorough before refill the tank, with water from the main source via the normal ball float valve intake pipe.


See how a clean water storage tank should be.
Imagine you bathing and drinking the
contaminated water before the cleaning.
Go and inspect your own storage tank now.