Thursday, November 17, 2011

Shellac & Varnish Wooden Door/Furniture.

See the faded finishing, especially the
lower portion of the doors
.

It is nice to have wooden furniture or doors painted with Shellac to maintain its natural wood grain finishing and enhance its aesthetic quality. But the upkeep of the Shellac surface can be problematic. Shellac  is not resistant to water and UV ray. Prolonged exposure to water and UV ray can damage the Shellac surface finishing.

Close up view of the faded door finishing
My main door is made from Balau wood. Both the door frame and doors are solid Balau wood.  The constant exposure to rain water and sunlight can damage the glossy finishing of the surface. This requires regular Shellacing and Varnishing  every three years,  to protect the wood from fading.

See the damage to the door frame.
Restoring the Shellac finishing of the  door looks simple but required lots of skill and patience. Shellac is a solvent based resin and is quick dry. Therefore, attention to the surrounding heat and humidity level  is crucial at the time of application. This will ensure a smooth and un-encumbered brushing. If the Shellac evaporated too fast, the brush will turn gummy and sticky. A gummy brush does not give you a smooth finishing.  When this happened,  dip  the brush  into some thinner /solvent .

Thinner and Shellac in bottle are readily
available in hardware shop.
A very thin layer of Shellac is applied for each coat, with three coatings preferred.  Between each coat, the dried surface  must  be sandpapered in order to achieve a smooth finishing.

Use waterproof sandpaper to avoid excessive dust during sanding. Dip the sandpaper into water before using. Select a good quality Shellac brush with soft bristles  that does not fall out easily or  stick to the coating.  Apply the Shellac slowing and gently. The brush stroke should preferably moves  in one direction only.

Materials required are:-

1.       One bottle of Shellac (RM4.50, USD1.40)
2.       One bottle of solvent/thinner. RM3.50, USD1.10)
3.       One Shellac brush. RM8.50. USD2.65)
4.       Three sheets of waterproof fine sand paper. (RM0.80, USD0.25/sheet)
5.       One bottle of Varnish (optional)(RM4.50. USD1.40)
6.       One pair of cotton hand glove.RM1.20, USD0.38)
7.       A small container to dilute the  Shellac to the required viscosity and holding the brush.
8.       One roll of masking tape (to insulate non wood area from the brush during painting.)(RM2.50 USD0.80)
Apply Shellac gently and moves the brush
in one direction only.


Do not do Shellacing with the fan on or during windy weather. You should also avoid extremely hot and dry weather during coating.

This job took 3 weeks to complete with an average of two hours per day (42 manhours).


Wednesday, October 5, 2011

Making your own Garbage Bag Holder.

Completed stand c/w garbage bag


This idea popped up  in my mind while I was clearing my garden of dried leaves and cut grass.  Gathering those dried leaves and grass into a garbage bag is quite a hassle. How to handle  a rack, a dust pan and a soft garbage bag at the same time?  Either I get a helper to hold the garbage  bag while I rack the leaves and grass into the dust pan or I get a large container to hold the bag.  Either way is cumbersome.
Materials and tool required

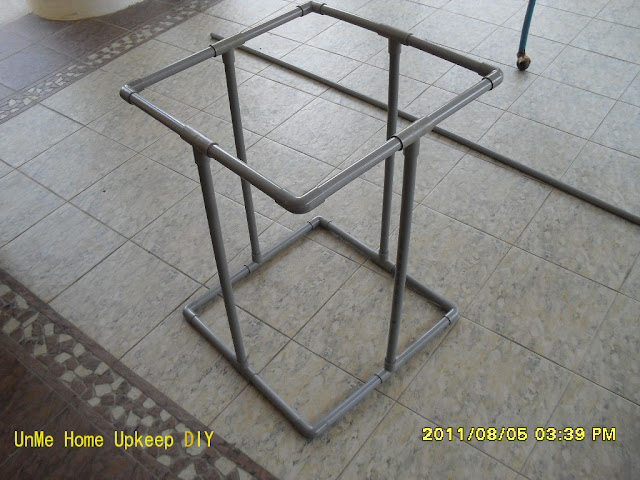
I made a garbage bag holder using the left over PVC pipe from maintenance job. The large size garbage bag is 75cm X 90cm (2 ½ ft X 3 ft).  The stand should have a top frame to hold the bag. It should be 14 inches X 14 inches by 2 ft height. The bottom frame preferably be 16 inches by 16 inches.

I bought eight pieces of elbow and eight pieces of T-joint plus one can of PVC pipe glue to complete the job. Cut the PVC pipe into four pieces of two feet long, eight pieces of six inches long  and eight pieces of seven inches long.  The elbow and T-joint will add two inches to each side of the perimeter of the frame.
PVC pipe cut to the required lenght

Firstly, fix up the pieces to get the alignment correct without  using PVC glue . The glue is quick dry and cannot be disconnected once applied on.  Fix the two  square frame on a flat surface to get the elbow and T-joint aligment correct.  Finally, join the two square frame with four vertical pipes of 2 feet each..

PVC Elbow
If the elbow alignment is correct, the whole stand would be in balance and sturdy. Otherwise, it will be wobbling.

To  use,  just fix the garbage onto the top frame and secure it by large paper clips.
PVC T-Joint


The total cost of materials are as follow:-
1.     One piece ½” dia PVC pipe (20feet cost RM9.50)   RM0.00 (from left over)
                                                        2.     Eight pieces of PVC elbows @ RM0.50 each    cost     RM4.00
3.     Eight pieces of PVC T-joints @RM0.70 each cost    RM5.60
4.     One can of PVC glue @                                               RM2.40
5.     Two piece of paper clips @RM0.80 each   cost         RM1.60
                                                                                
                  Total Cost for the stand is RM13.60  (USD4.30)                  
       

PVC Glue

Completed Stand without the Garbage bag

Thursday, September 15, 2011

Maintaining & Coating Concrete Slab Roof.


What is the best type of roof for Malaysian houses? There is No answer to this question.  Every type of roofing material has its advantages and disadvantages.
Untreated slab with cracks and chipped surface.

The most  commonly used roofing is the concrete roof tile.  Some use clay tile, metal roofing sheet or aluminium roofing sheet.  There are also houses having flat concrete slab roof.  This type of roof is more visible in Europe and USA than in Malaysia.

My house used a combination of concrete slab roof and glazed clay tiles. The Architect  designed and proposed the concrete slab roof due to construction issues.  This portion of the roof is waterproof  and does not leak even during extreme thunderstorm.
Mixing cement with white clay(lime) and sand for plastering

The tropical weather of Malaysia is unkind to concrete roof.  The sudden change in temperature from very hot sun to heavy rain caused fine cracks and chipping of the plastered surface of the concrete slab.  If the cracks and surface chippings are not patch regularly, the waterproof coating will wear off and eventually leakage will appear.

Re-plastered surface

In order to avoid the problem of regular patching, I use a coating of polymer sealant.  This material can grout the cracks  and level the chipped off surface.


This is my biggest DIY project spreading over a period of nine months. I worked in stages and not more than three (3) hours per day.

Partly cleaned slab
First, I water jet the floor slab and the beams to remove dirt and fungus. Then, re-plaster the cracks and the worn out surface with a mixture of cement, white clay (lime) and fine sand.  Let the re-plastering cure and set in for about  a month. Some plaster may not stick well and peeled off. I re-do the peeled off part until the surface is completely even. 

Clean the slab with pressure water jet

The surface must be totally clean and dry before applying the polymer sealant. The re-plastered surface is water jet again and allow to dry for a couple of days.


The “Pentens” polymer sealant can be applied on the surface by using a paint roller or a big broom with soft bristle. This is a water-based sealant. If the compound is too thick, add a bit of water but not more than 20% by content, for easier application.

Pantens Coating Compound. This 20kg pail cost RM250.00.
Coating done in stages
This coated surface is easy to clean with a wet mop. This compound has low absorbent for heat and lower the indoor temperature. Do not use any sharp object or metal on the surface. This is like Epoxy coating. It can scratch the coating easily.
One third of the slab completed with coating
Apply two coats of the sealant with three-hour interval. Do not step on the coated surface, even if you feel it is dry. The sealant takes about twenty four hours to adhere firmly to the concrete surface. Always leave some space, a walking lane, for you to walk while applying the coating without stepping on it.  The space is also required for applying the second coating. The walking lane can be coated later, preferably after three days, by then you can walk on the already coated surface.
The entire concrete slab is coated.
The tools required are:-
Some of the tools required

A pail for water, a pair of cotton gloves, a scrapper, a paint roller, a paint mixing tray, a soft bristle broom, two paint brushes, a big picnic umbrella and a pressure water cleaner.

30 kg of Pentens sealant was used to coat the entire surface. Total cost of the sealant is RM375.00(USD125.00)


Sunday, August 14, 2011

Fish Pond Apron

This  is a nice looking Balinese design Koi fish pond, with a  pebble apron. And this picture will be good for only about six months. 


Thereafter, the grass and weeds will invade the apron and the side of the pond.
This Koi fish pond was designed and built by an Indonesia Koi pond expert. Everything was in a perfect condition,  until the weeds and grass appeared among the pebbles. My initial solution was just regular weeding. The grass and weed were too pervasive and invaded the gaps between the tiles of the pond. They were perpetual  nuisance.  A permanent solution is required.  
I decided to build a concrete slab apron, with pebbles spread on top of it, in order to retain the feature.  A contractor’s quote for the job is RM2,000.00 (USD666.00) with material and labour supplied.  I pondered over the quotation for a couple of weeks, before deciding to go DIY.


It will be a tough job to complete the apron at one go and single-handedly. This will take at the least three  full day of 8 manhours per day.


 I wanted to do this at my own leisure time and enjoy the DIY.      


 I did  not set a target completion date and without a fixed work schedule. If the weather is kind to me, I will work on that day and not more than 3 manhours per day so as not to exhaust myself.
I decided to partition the apron into six blocks and make one block at a time.
Material required are sand, cement, thick cardboard, 1"X2” wood and steel bar. The steel bars are used to re-enforce the concrete slabs and prevent  cracks. The thick cardboard and wood are for formwork.

Tools required are wheel barrow, spade,  cement trowel and a large picnic umbrella for shade. 

One and a half bag of cement (75kg) and one excavator bucket load of sand (local hardware shop sell sand by excavator  bucket load) is required. Total cost is RM135.00(USD45.00), excluding the tools.

The first task is to remove all the pebbles. Then, remove the invasive roots of the grass thriving underneath the pebbles. This is followed by the removal of top soil.
Once the ground preparation is completed, lay the formwork for the concrete slab.

Prepare the cement mix with 1:1 cement/ sand ratio and mix with water thoroughly. The amount of water will depends on the condition of the sand (dry or wet) and the required viscosity of the mix. There is no formula for the amount water.

The cement mix is pour into the formwork with two parallel steel bars place in the centre between the bottom and top surface of the slab. Vibrate and level  the cement mix with a cement trowel. Vibration is to compact the cement mix and prevent honey comb formation  inside  the concrete slab.
Let the cement mix to cure for at least 8 hours before stepping on it. If the weather is too hot, sprinkle some water on the semi-hardened surface. Heat is generated during curing process.  This is to cool down and slow the expansion of the slab, in order to prevent cracks.  Do not use the jet or direct tap water. The water pressure may damage the surface.  


Thursday, July 14, 2011

Repair Electric Kettle.

Collection of Kettles

I have a collection of kettles. Jug kettle, electric kettle and conventional stove kettle. This is not my hobby. I accumulated that many kettles because I refused to discard them after they failed. 
Electric Kettles and Jug Kettle

A conventional stove kettle is kept in my house for emergency purposes, in the event of a power failure. The failed electric kettles were kept in the kitchen cabinet, pending a solution.

I considered the failed kettle too good to dispose off as scrap metal. It is also too expensive to repair. The repair cost is not justifiable.  


The standard repair cost (Panasonic, Sanyo or Faber) is about RM120.00 (USD40.00).
            Heating element RM30.00
            Thermostat          RM20.00
            Labour charges   RM70.00
                                        ----------------
           Total                      RM120.00
                                        =========
Thermostat on the Left   and   Heating element on the Right

This is equivalent to the price of a new electric kettle.
The cheaper brands of kettles, made in Malaysia or China cost only about RM90.00(USD30.00)

Why bother to repair the kettle when the new one cost less than the cost of repair? Think of the mother Earth, think re-cycling.

The electric kettle comprises six components i.e. the body, the cover, the handle, the heating element, the thermostat and the silicon or rubber seal between the thermostat and the heating element. The components that usually failed are either the heating element or the thermostat or both.

With DIY skills, repairing an electric kettle is only a screw driver job of 30minutes.
Heating element positioned inside the kettle

I just discovered an electrical components and parts shop in Jalan Pasar, Kuala Lumpur that sells the kettle heating element and the thermostat. The price of these two components are affordable and justifiable to repair the kettle.These two components are standard sizes and fitted most brands of electric kettles.

The heating element cost RM20.00(USD6.30) and the thermostat cost RM12.00(USD4.00).
Secure the Thermostat to the heating element with 3 screws.

I got my old Panasonic kettle working for only RM32.00(USD10.80)

The old kettle bodies are more sturdy. The new kettle in the market today has a thinner steel sheet for the body, slimmer handle and poor quality heating element & thermostat. The Standard life span of new kettle is approximately three years only, as compared to my old faithfully kettle lasting more than ten years..
Old Kettle repaired @ the cost of RM32.00.

Saturday, March 5, 2011

Assembling and Installing Curtain Rail

Completely assembled curtain rail.


A standard double storey link or terrace house usually comes with  five (5) windows and one sliding main door plus one side door. This exclude the small toilet windows. For the 3-room apartment, there are three standard windows plus one large window at the lounge.
Blank curtain rail cut to the required length

The standard window size is four feet by four feet ( 4 X 4). The master bedroom window is slightly bigger, i.e. six feet by four feet ( 6 X 4). The sliding glass door at the lounge is usually ten feet by seven feet (10 X 7)

The Malaysia’s standard height of window is four (4) feet and the standard height of door is seven (7) feet.
Cross section view of blank curtain rail

End cap
Most Malaysian house owners prefer to cover the window and sliding door with curtain. Blinds are common in offices and commercial building but rarely used  for home.

The most common type of curtain rail is the hollow channel aluminium curtain rail.
To get a contractor to supply  and fix the curtain rail for the standard double storey house will cost approximately RM420.00 (USD135.00). But if you also purchase the curtain from the same supplier, you may get a discount for the curtain rail of 10 to 20 %.
Curtain rail rollers

Assembling and installing the curtain rail DIY cost only a fraction of the price charged by the contractor or curtain supplier.

Inserting rollers into the curtain rail
The curtain rail and all the components, such as the roller, end cap and bracket, are available at all hardware shop and DIY stores. The hardware shop will cut the curtain rail according to your requirement.

The price of the curtain rail ranging between RM1.20 per foot run to RM2.00 per foot run.. The price of the rail varies with the quality and thickness.

Closing and locking the end of the rail with
End cap.
The components cost and components used are quite standard too. End cap cost RM0.40 each, roller is RM0.10 each and the bracket is selling at RM0.50 each.

Completed curtain rail ready for installation.
You must provide six inches extra curtain rail length for each window. For example if the window is four feet wide, the rail must be four and a half feet long.

Mark the position of the bracket (3 inches above)
before drilling.
For every foot run of curtain rail, three rollers are required. You may add 10% more to the total number of roller, as spare. A bracket is recommended for every three-foot run of rail. A minimum of two brackets are required for each curtain rail.

To assemble the curtain rail, secure one end of the curtain rail with an end cap, with the lock screw tightened.  Insert the required number of rollers into the groove of the rail, through the opposite end.. Finally, close the opposite end of the rail with another end cap and secured it with the screw. It is that simple.

To install the curtain rail, a leveller, and electric drill, measuring tape and wall plugs & screws are required.
Level and align the rail position before
 fixing the brackets.


Drill to fix the plug and the bracket
Curtain rail secured to the bracket
The curtain rail is installed three inches above the top edge of the window.  First, mark the position to fix the brackets. Ensure that all the brackets position are in line and levelled. Then, drill the hole on the wall to lay the plug and secure the bracket with the screws.      Finally, fix and hang the curtain rail to the bracket.  There is only a screw and a clip to secure and lock the rail to the bracket. This is the most important part of the installation. If the rail is not secured properly to the bracket, the whole curtain and the rail can collapse.

Total cost of the job by DIY is only RM66.50 (USD21.50) as compared with the contractor’s cost of RM420.00 (USD135.00). Just look at the amount you can save.
It is worthwhile to be a handyman and practise DIY.


The curtain is ready for hanging the curtain.
Another rail ready for hanging curtain.